


Week Three - Four (Jan 22 - Feb 2)
- Jan 30, 2018
- 2 min read
During these two weeks, we have decided to divide the job in two main parts. First, we have decided to work on the electronic part for the trays and main microcontroller.
Second, we went ahead and sent the drive screw and gears to a machine shop to have set screws put into them. With that, we will be able to finish the framework. Thus, we decided to work with the motor so that we can fixed it to the framework as soon as we received our parts back from the machine shop.
First Part
For the trays, we have used the Arduino Pro Mini (as mentioned before). At the moment we received both microcontrollers, we realized that we needed to solder the pins in order to be able to program them and use them with a breadboard.
Another issue that we have found during these two weeks is that the ESP8266 WiFi Development Board cannot be used for the communication between Arduinos due to the fact that it was too complex for what we needed. Thus, we found a little device called NRF24L01+ which uses Radio Frequency (RF) to transmit and receive data. It is important to mention that this device requires a maximum of 3.3 volts and the Arduino Pro Mini provides 5 volts. To counter that, we used a voltage regulator that came with the RF devices.
The circuit for the trays was built as follow:

Although the circuit might look overwhelmed, it is important to remember that it will be within an enclosure that we are going to build using the 3-D printer at Valencia College.
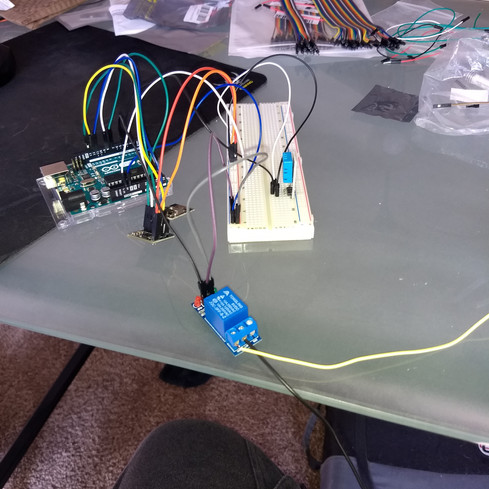
On the other hand, we have also part of the code for the main Arduino which will be receiving the signal from the trays, measuring the ambient temperature and humidity, controlling the water pump and motor, calculating the water flow, stopping the system, and sending data to Mobile App. So far, we have created a program for most of its functions: temperature and humidity, signal from trays, control water pump, and calculate water flow. The circuitry for the main Arduino is looking as follow:

Real Pictures of Circuits


Second Part
For this part, we have decided to order a solid state relay because it is safer and better for AC motors. We have also gotten some parts that will help us create the circuitry for the AC motor. The pictures below show what we were working on.


Comments